In today’s digital economy, the ability to sell online is no longer a luxury—it’s a necessity for businesses of all sizes. If you’re looking to build a powerful, flexible, and fully-owned online store, the combination of WordPress and its premier e-commerce plugin, WooCommerce, offers an unparalleled solution.
WordPress, the world’s most popular content management system (CMS), is not just for blogging. Its true power lies in its incredible flexibility, which allows it to be extended into a robust and scalable e-commerce platform.
Unlike hosted solutions like Shopify or BigCommerce, where you pay a monthly fee and are limited by the platform’s rules, building with WordPress gives you:
- Full Ownership & Control: Your store, your data, your rules. You have complete control over every aspect of your website without fear of being shut down.
- Unlimited Customization: With access to thousands of themes and plugins, you can design a store that perfectly matches your brand and add any functionality you can imagine.
- Scalability: WordPress can power everything from a small boutique selling a few products to a massive online marketplace with thousands of items and high-volume traffic.
- No Monthly Platform Fees: The WordPress software is free. While you pay for hosting, you are not charged a percentage of your sales or a recurring platform fee just to exist.
To get started, you simply need a domain name, a reliable web hosting plan, and a fresh installation of WordPress. From there, an e-commerce plugin is all you need to start selling.
What is WooCommerce?
WooCommerce was originally launched by WooThemes in 2011. In 2015, it was acquired by Automattic — the creators of WordPress. Since then, WooThemes evolved into WooCommerce, adding more features and quickly becoming a giant in the eCommerce space.
This plugin is powerful, flexible, and extremely versatile. With WooCommerce, you can sell just about anything! It currently boasts over 7 million active installations on WordPress.org and holds a solid 4.5-star rating from users.
Is WooCommerce Free to Use?
Absolutely! WooCommerce is an open-source plugin that turns your WordPress site into a full-blown online store. It’s completely free to download and use on any WordPress website. While there are premium plugins available, they’re entirely optional.
That said, running an online store isn’t totally free. You’ll still need to pay for a domain name and hosting to get your site online. Plus, consider additional costs like branding, marketing, and advertising as your business grows.
How to Set Up WooCommerce
WooCommerce is just like any other WordPress plugin — simple to install and easy to configure. It even comes with a setup wizard to walk you through the essential steps and get your store up and running fast.
Here’s a step-by-step guide:
Step 1: Install the WooCommerce Plugin
If this is your first time setting up an online store, we recommend choosing a WooCommerce-friendly theme before installing any plugins. This can help reduce compatibility issues down the road.
Once your WordPress site is ready, your first task is to install the WooCommerce plugin. You can do this for free right from the WordPress Plugin Directory or upload it manually.
To install it:
- Go to your WordPress dashboard.
- Navigate to Plugins > Add New.
- Search for “WooCommerce”.
- Look for the plugin by Automattic, then click Install Now.
- Once installed, click Activate.
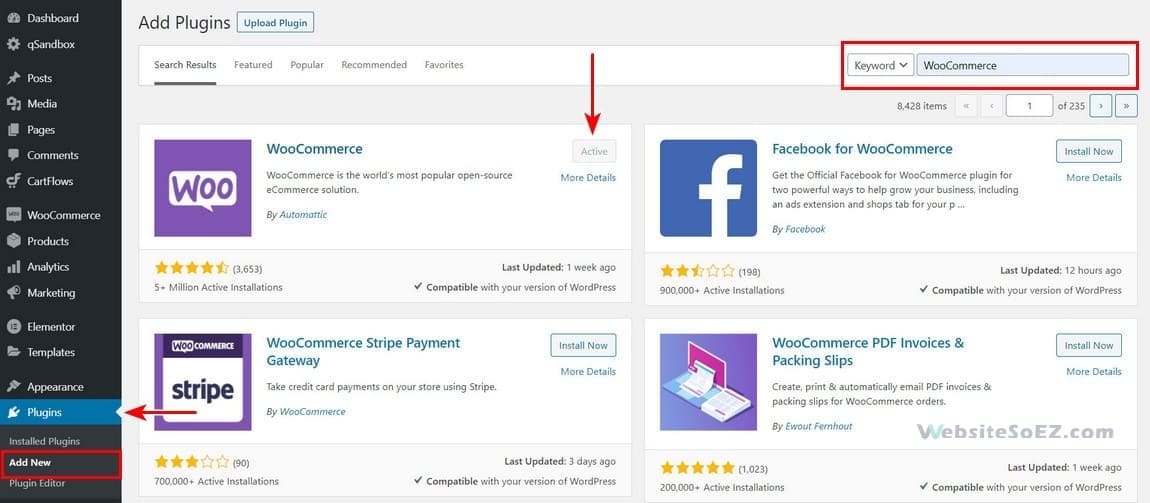
Boom — the setup wizard will now launch automatically!
Step 2: Run the Setup Wizard
Right after activation, WooCommerce will prompt you to go through the setup wizard.
This is totally optional, but we recommend following through so you can quickly configure your store’s essentials.
First Page: You’ll be asked to fill in basic store details. Don’t worry — everything can be updated later in WooCommerce settings.
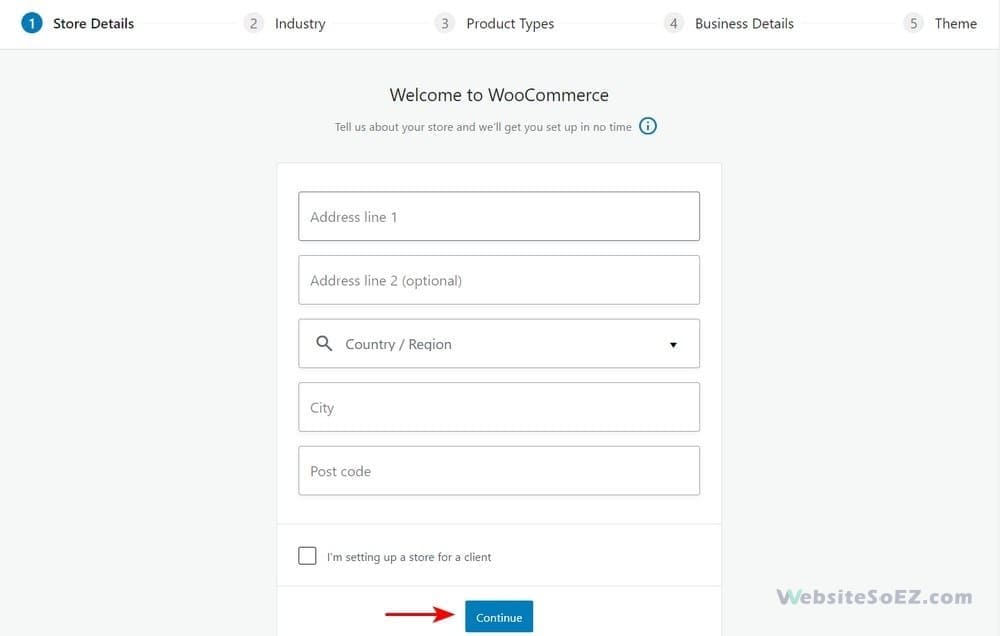
Next, click Continue.
Choose Industry: Select the industry your store belongs to.
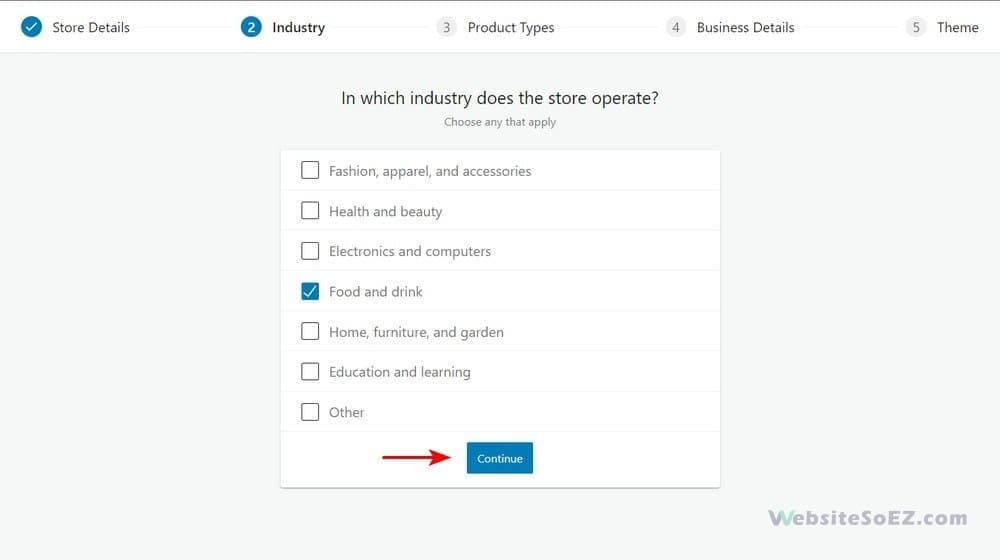
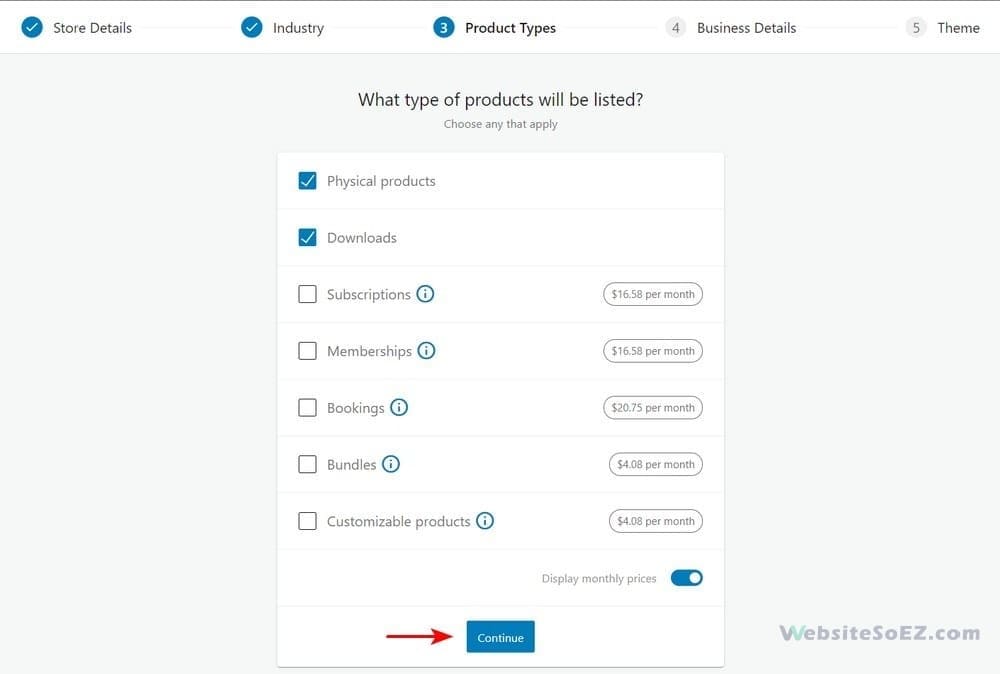
Select Product Types: Choose whether you’ll sell physical products, digital downloads, or both.
Want to sell Subscriptions, Memberships, Bookings, Bundles, or Customizable products? These are available as premium add-ons.
Business Details: Indicate how many products you plan to list and whether you’re selling on other platforms too.
Free Features: You’ll get the option to enhance your store with free extensions — like WooCommerce Payments and Google Listings & Ads.
Feel free to uncheck anything you don’t need.
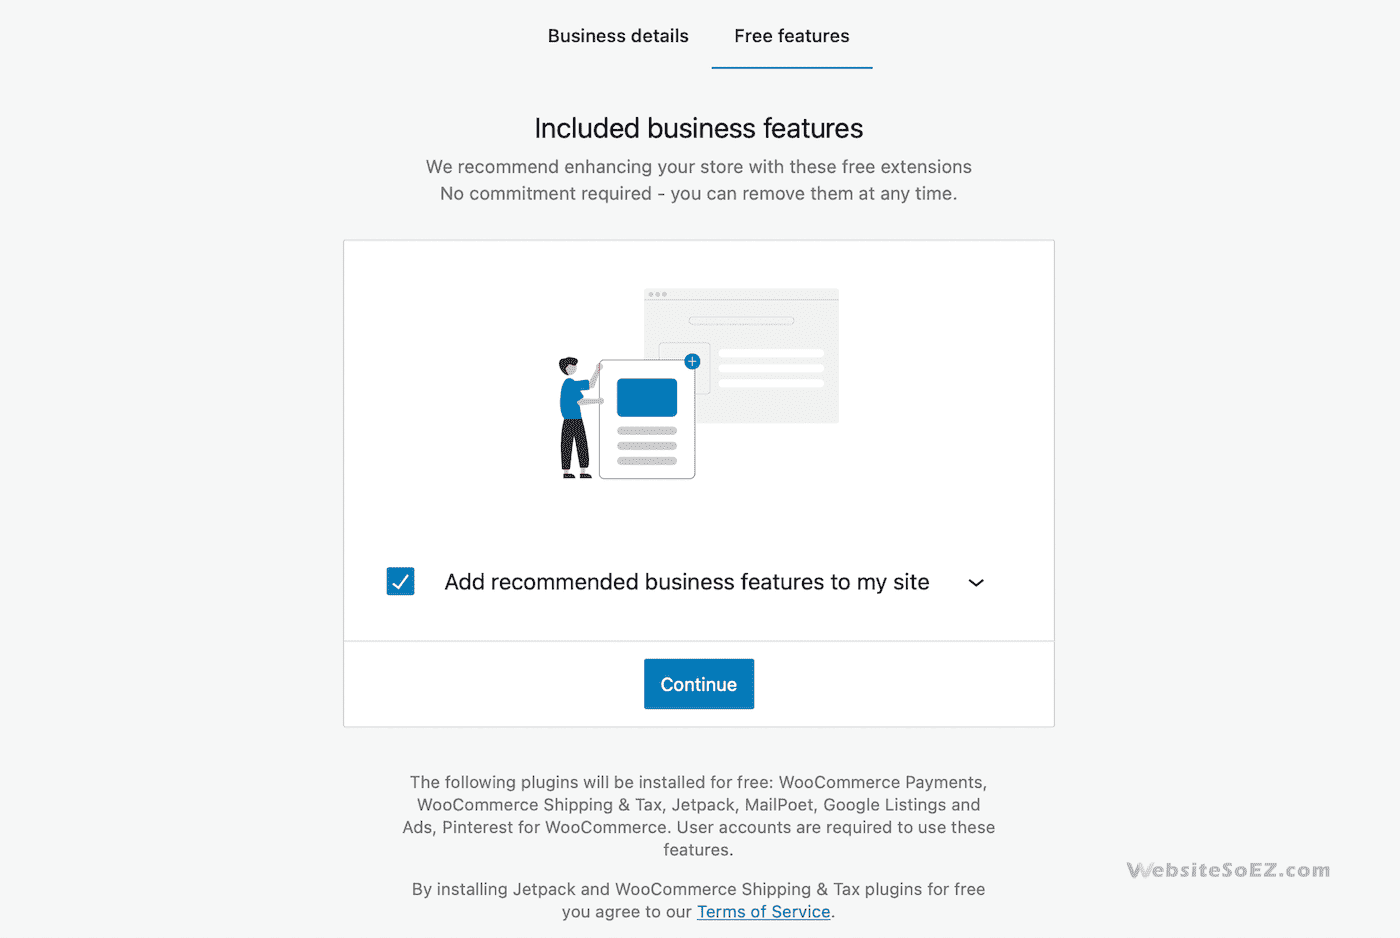
When you’re ready, click Continue to finish up.
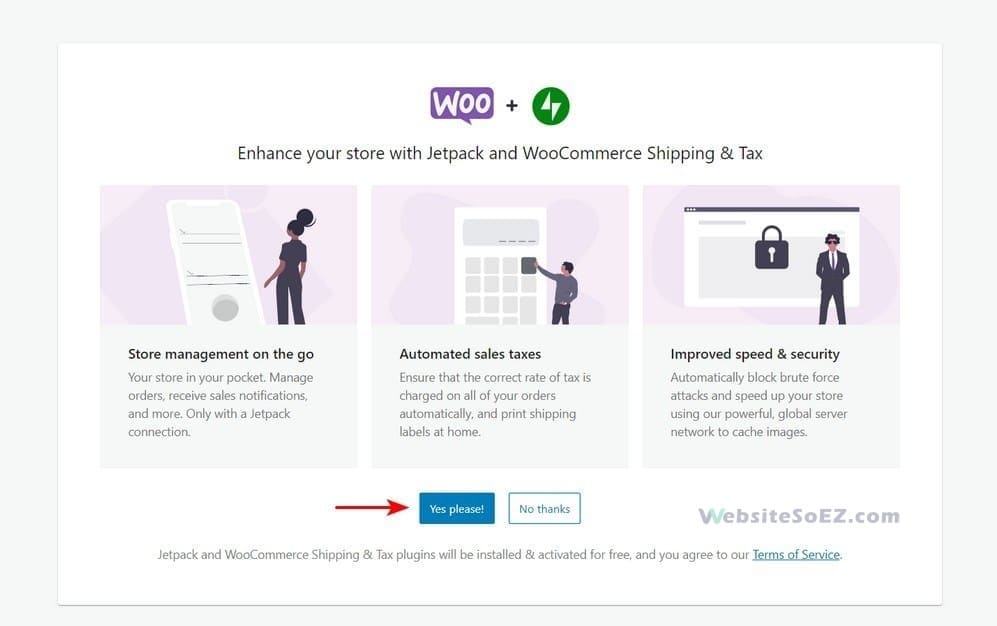
Optional: Install Jetpack — Jetpack is a multifunctional plugin offering features like security, performance, and analytics. Totally your call whether to install it!
Step 3: Add Products to Your Store
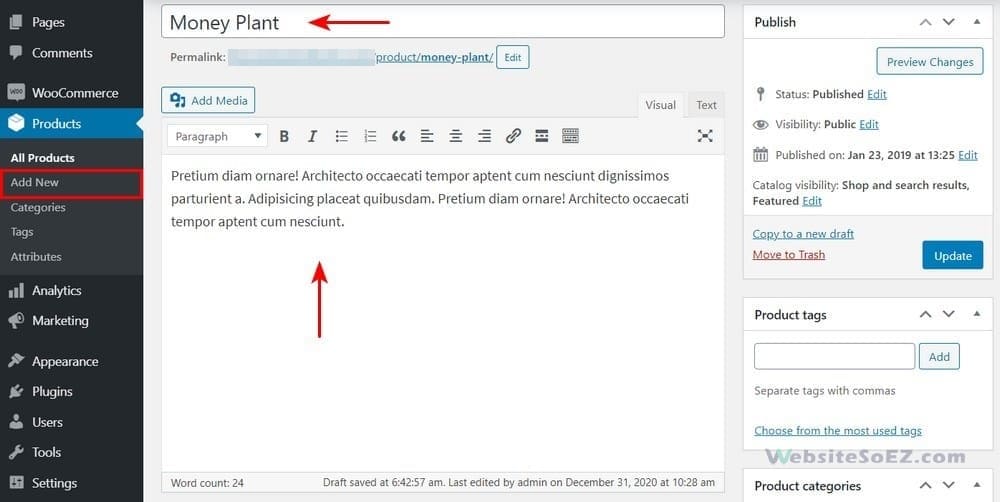
Click on Products > Add New to start adding products.
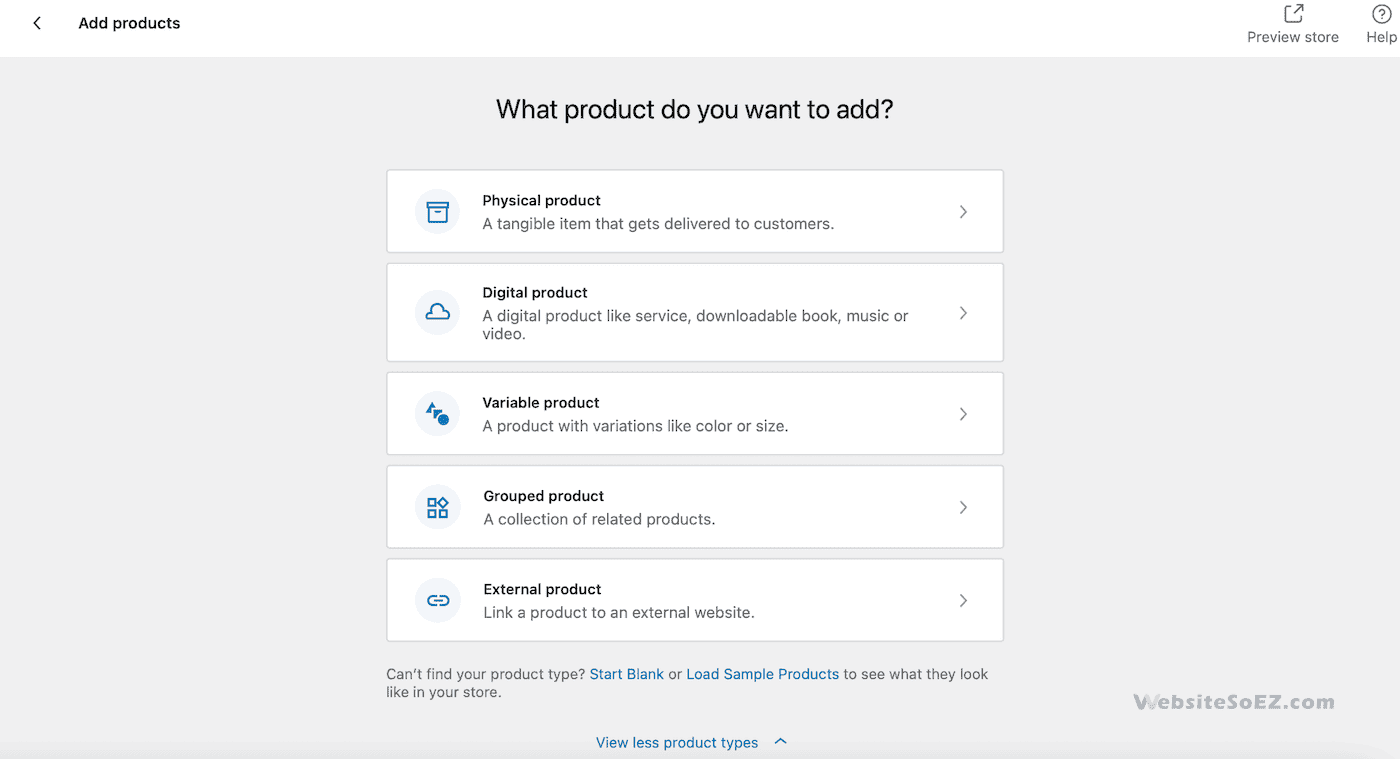
WooCommerce will ask what type of product you’re creating. Choose from simple physical items, digital downloads, variable products, and more. You’ll then land on the product editing screen.
Add a Product Title & Description
Enter your product’s name, followed by a detailed description explaining what it does and why it’s awesome!
Manage Your Products with Ease
As your catalog grows, you’ll need an easy way to manage everything. Luckily, the Products tab in the dashboard makes this a breeze.
Click All Products to see everything you’ve listed. You can add, edit, or delete products right here.
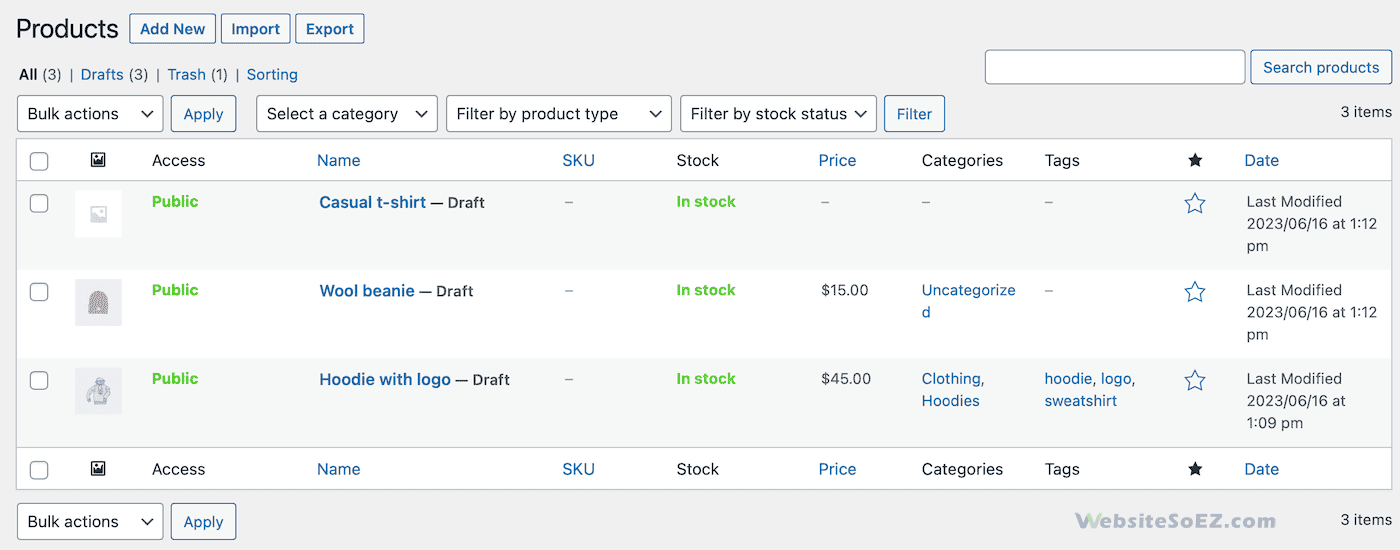
Under the Products menu, you can also manage Categories, Tags, Attributes, and Reviews — just like managing blog categories in WordPress. It keeps everything tidy and organized.
Step 4: Set Up Payments
Go back to WooCommerce > Home, then click Set up payments.
Choose the payment gateway(s) you want to use — such as credit cards, PayPal, or Stripe.
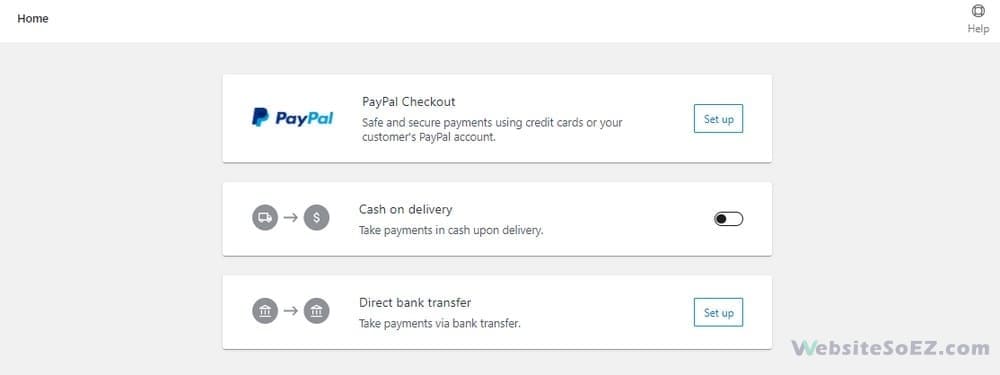
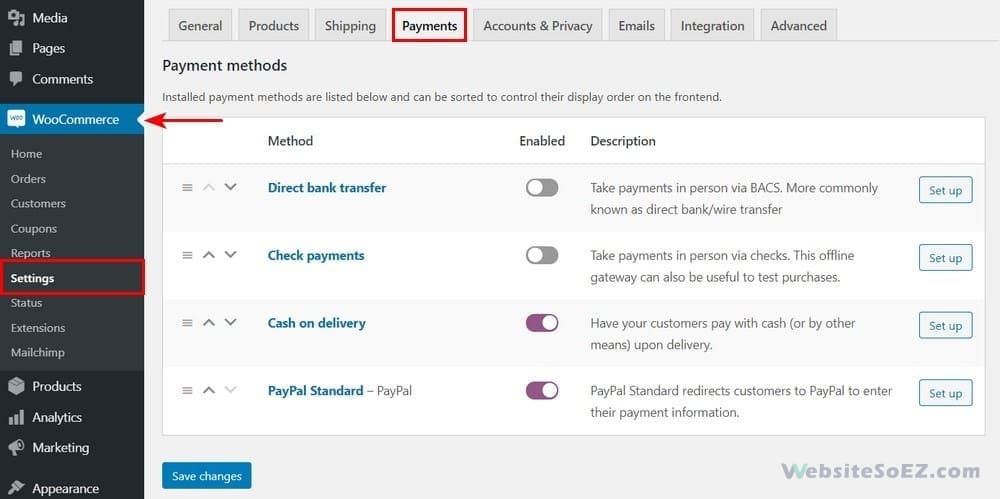
You can also go to WooCommerce > Settings > Payments to configure everything manually.
Step 5: Set Up Shipping
Back on the WooCommerce Home page, click Set up shipping.
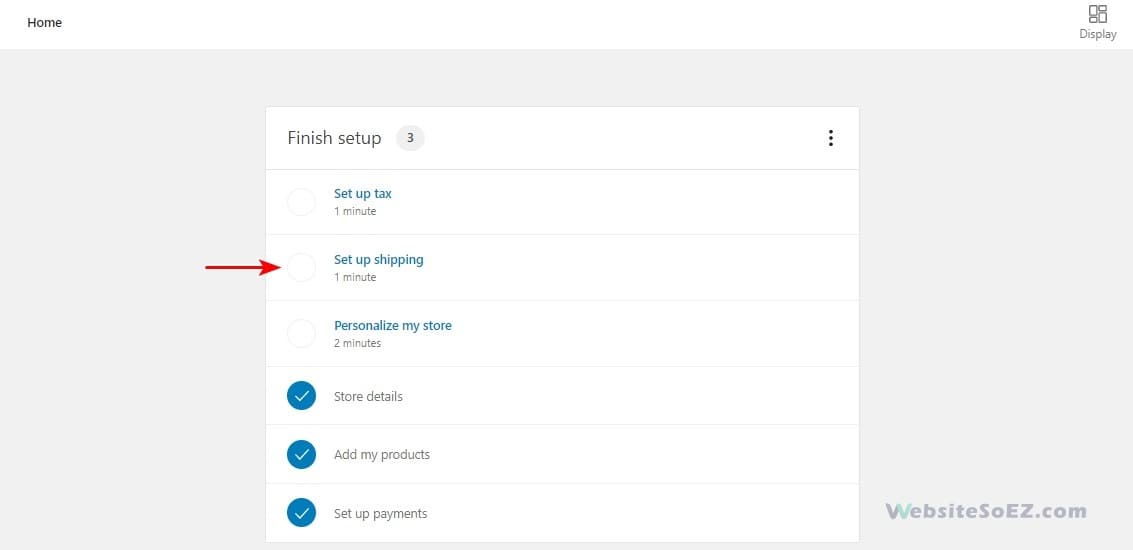
Add your shipping zones and costs. These will depend on your location and product types. If you’re unsure, check with your local post office or carrier. You can always update this later.
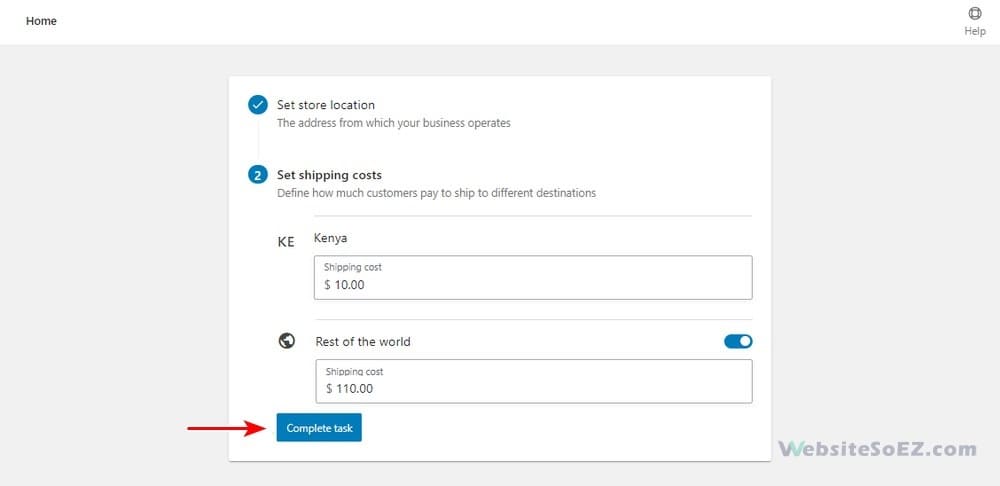
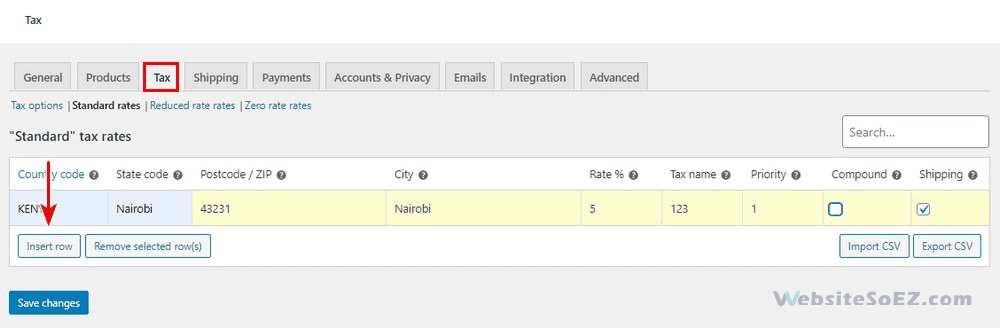
Step 6: Configure Taxes
Go to WooCommerce > Home and click Set up tax.
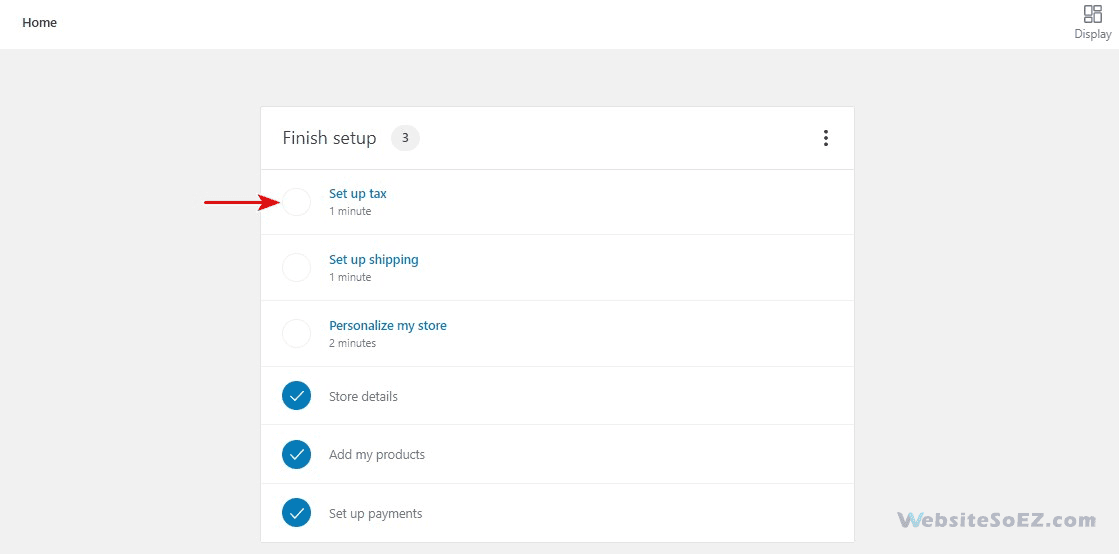
Click Configure, then insert your tax rates. Once done, don’t forget to save changes!
Step 7: Install Optional Add-ons
At this point, your store is basically ready to go!
WooCommerce will now show you some optional tools that can boost your store’s success.
For example, you might see:
- MailPoet — to send follow-up emails and newsletters
- Google Listings & Ads — to list products on Google and run ads
- Pinterest & Mailchimp integrations — great for reaching a wider audience
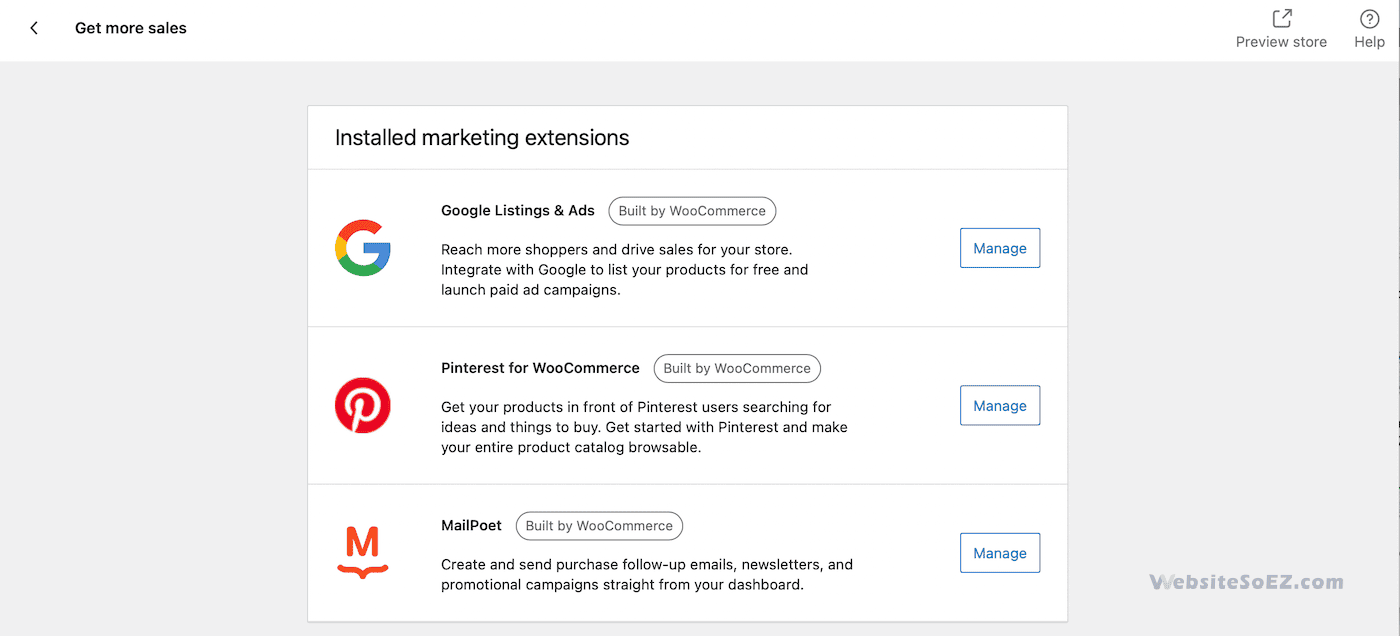
Click Get Started next to any tool you’d like to install.
Step 8: Personalize Your WooCommerce Store
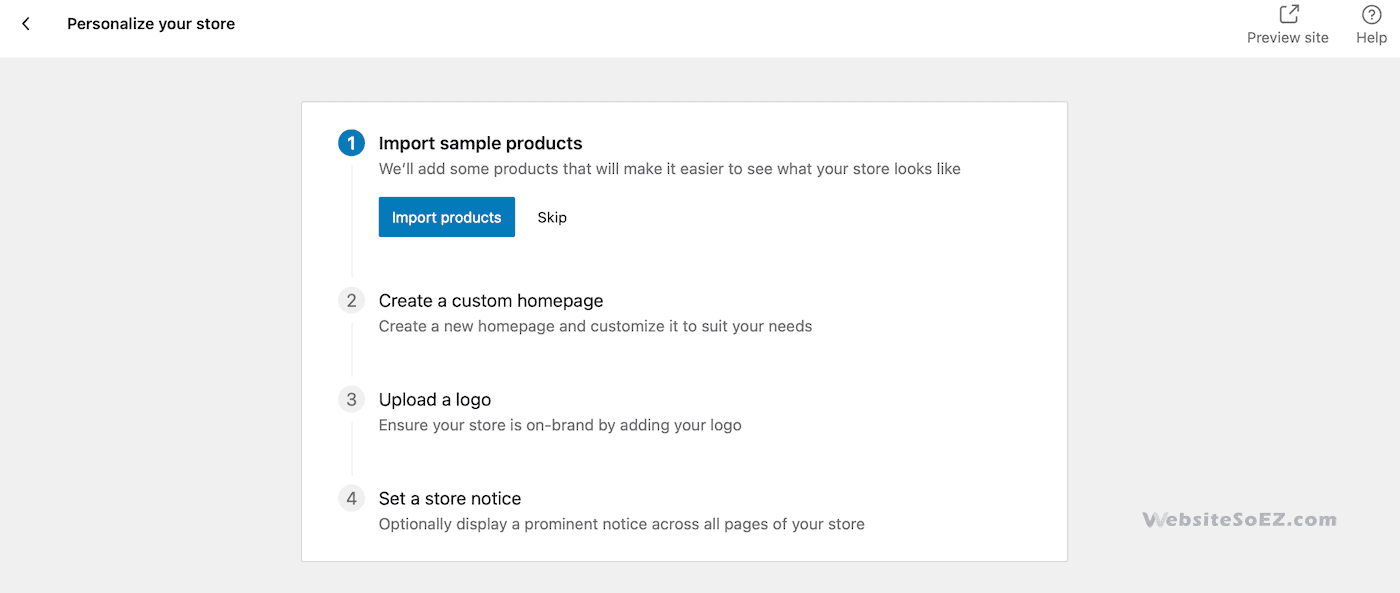
Last but not least, head back to the WooCommerce setup page and click “Personalize your store.”
You’ll be able to customize the look and feel of your shop using themes and layouts. If you haven’t added many products yet, you can click “Import Products” to preview how your store will look.
To really make your store shine, consider using a powerful WooCommerce-compatible theme and the Elementor page builder to design fully customized pages.
With WooCommerce, setting up an online shop is fun, fast, and flexible. Whether you’re selling quirky collectibles, digital art, or homemade crafts — you’re all set to turn your WordPress site into a selling machine!
Let the sales begin 🚀